
So you finally got your copy of Marvel Champions’ second expansion – Galaxy’s Most Wanted, and you’re ready to take on the campaign. You pull out your strongest deck, ready to zoom through it. You remember The Rise of Red Skull, it may have been a bit of a challenge, you had your losses, but you expect a similar success. Unfortunately (or not, if you like the challenge) Drang takes you down and you are left to wonder – is this even possible?
Don’t fear! We are here to give you tips and insight on how to build your deck and take on Drang!
This guide is focused on two players, but you can apply similar strategy to your solo runs.
Build your encounter deck
Let’s start by setting up our board and expert encounter deck. For this you will need:
Villain: Drang II and Drang III
Main Scheme: Terrestrial Ivasion (1A/1B), Protect the Planet (2A/2B)
Campaign Side Scheme: Badoon Blitz (178)
Encounter Deck: (33 cards + players obligations)
- (6) Brotherhood of Badoon – Take out Badoon Ship (GMW 63) and Drang’s Spear (GMW 64)
- (10) Band of Badoon
- (6) Ship Command – leave aside the Milano (GMW 142)
- (10) Standard and Expert Encounter Set
- (1) Badoon Headhunter minion (183) and only the minion
- Every Players Obligation
Place the Badoon Ship and Drang’s Spear next to Drang, and the Milano in the player’s area. Ready to play now!
The Villain – Drang
Drang is very damage-focused villain. He himself has 3 attack, and at stage two he comes in with his spear (Drang’s Spear). On top of that every turn the Badoon ship will charge up and after 4 charges, it deals 2 indirect damage to each player. If that was not enough damage, he brings in some strong and annoying minions. Things can easily get out of control, and you can quickly find yourself overwhelmed.
Drang’s Spear
First thing you want to do (if you play Drang II or if it comes out of the encounter deck), is to remove Drang’s Spear. The spear not only gives him +1 attack, but also gives him immunity to stun and confused status (stalwart is the new keyword for this immunity). As the encounter deck has high number of boost icons (mainly 2 and 3s), he can do from 4 to 7 damage in one turn regularly, which is a lot of damage, so removing his spear early will help you to keep your health under control, particularly if your heroes can stun and confuse the villain regularly. It requires 2 physical and 1 mental resource to remove the spear, so if you are playing with more then one player, you need to decide who will delay their turn to do that. A good rule of thumb is anyone who draws the Strength resource should do it, because that’s the most efficient way to pay for those two physical icons.
Terrestrial Invasion
The main scheme doesn’t start out with much threat, but it is good to keep it down as much as you can. Sure if you let it blow up, it won’t be the end of the game, but if you’re playing the campaign, keeping the scheme on phase 1 will give you an extra unit at the end of the scenario, and that is not to be underestimated. It’s a good idea to use the Milano to remove 3 threat from it every turn, particularly in two player games, as while the extra resource is helpful, removing 3 threat for 1 resource is a better rate than you’ll get on almost any card. If you run Justice (which is pretty much a must in the campaign) put it Under Surveillance (Thor #31) as soon as possible.
Badoon Ship
Badoon ship will be a big pain as it will be dealing damage to you every few turns. The Badoon Ship goes up every villain phase, and it can accelerate in few ways. At stage one and two of the villain, it goes up only if Drang schemes, meaning you need to be careful when you flip into alter-ego form and don’t heal. At stage three it rushes you by charging up every time the villain activates (both scheming and attacking).
Badoon Engineer (GMW #65) is another way to accelerate the charge. Try to get rid of him as soon as possible so he doesn’t charge up the ship.
The Badoon Ship damage is indirect, meaning you can split it between your allies and your identity, but remember the rule that you cannot assign more damage then your allies have health left, even if they have tough status. (Covered in Indirect Damage in the latest version of the Core Rulebook on page 9). The Badoon Ship’s damage adds up quickly, so once Drang’s in his second form on expert difficulty (Drang III), you’ll want to burn him down as fast as possible to avoid the damage getting too overwhelming. Take your time in Drang II to make sure that can happen. If you flip him too soon, the Badoon Ship is going to punish you quickly.
Badoon Blitz (Campaign Only)
This is the card that will make or break your run if you are running expert mode campaign.
On Standard Mode you can ignore it for now and slowly take it down with effects like Multitasking (Scarlet Witch #13), or use basic thwart of hero or ally when you have spare. Try to remove it at the end of the last player’s turn, as it will make you discard a card from your hand.
On Expert Mode it gets trickier, as it not only has more threat to remove, but it also adds an acceleration counter. If you are not rushing through the boss and want to get the units, you will need to remove this as quickly as possible. If you are playing with 2 or more players, and you are packing Justice, you should consider Spider-Man (Rise of Red Skull #45) as it is built to take down side schemes. It is a very expensive card (5 cost) but there are a lot of heroes that could play it for low cost like Scarlet Witch’s Chaos Magic (Scarlet Witch #2) or Captain Marvel’s Energy Absorption (Core Set #14), on top of the Justice resource The Power of Justice (Core Set #62). Don’t forget that the Milano also generates a resource, and while it is not recommended to use it for allies, you need to decide in the situation if it’s worth it. With Spider-Man, it usually is.
Lay Down the Law (Ant-Man #31) is another card to consider, even if you are not playing Ant-Man or Wasp, as if you don’t have heal or other ways to prevent the indirect damage, and his attacks, you will be flipping regularly Alter-Ego to heal up from Drang’s attacks and the Badoon Ship.
If you do not have Justice, you may want to put in cards like Chase Them Down (Core Set #52), as he has a lot of minions that you will be able to clean up and trigger it.
The Milano
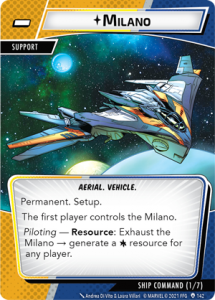
Image © Fantasy Flight Games
We’ve mentioned it, but for this scenario you have a very strong permanent card in play – The Milano. As a permanent, nothing can remove it and provides you with not only a free wild resource but also a great way to remove threat from schemes. It is important to note that this is not considered as thwart so Patrol and Confused cannot stop you.
All of the side schemes that come from the encounter deck, allows you to remove 3 threat from it by exhausting the Milano, and while that sounds like you don’t need Justice with it, it is easy for the side schemes to get out of control.
You also cannot always rely on the Milano, as Ship Command cards have three treacheries that will give you the option to exhaust it to avoid spending two identical resource, or make the first player suffer stun, discard a card or deal 3 damage. The new keyword Peril doesn’t allow your teammates to help you not only with the resources, but also with advice or hints.
When you play with two or more players, don’t rush to use the Milano as a first player, as anyone can request you to either generate a resource for them, or remove threat from scheme on their turn.
Minions
If you don’t play with the Aggression aspect or heroes that can’t deal damage to minions, you will have to chose your battles. You already know that you should remove the Badoon Engineer as soon as possible or it will charge up the Badoon Ship and deal indirect damage.
Badoon Assassin (GMW #117) is scary only when it comes into play as an encounter. He will immediately attack you for 3 when revealed, and when you are already taking so much damage around the villain and the ship, you should be careful as he can finish you off. Once he has done his attack, he is no longer a problem, as he has only 1 attack and scheme, and with his 1 point of health, he can easily kill himself on retaliate or damage from cards like Squirrel Girl (Captain America #13) and Ground Stomp (Core set #22). It is a totally valid strategy to not kill him and focus on the villain, this way you can be sure he will not come in as a boost or encounter any time soon as they are only two copies. Make sure that if the Assassins aren’t in the encounter discard pile or in play, you account for potentially taking 3 more damage than you anticipate, because this guy might be coming for you suddenly at the end of the villain phase.
Badoon Sentry (GMW #120) is another minion you can safely ignore when it comes out. As a boost it gives tough on the villain or extra 2 boost icons if he is already tough. As an encounter it is just annoying to deal with with his 5 health and 1 retaliate, it may be worth taking the 1 attack or 1 scheme for a while if you don’t have aggression hero. If you want to remove it, try using damage-dealing abilities that are not attacks, like Black Panther’s Energy Daggers (Core set #46) or Tac Team (Core set #56). There are two copies in the deck, so you can expect to see him regularly. If your attack won’t immediately kill the sentry, then effectively your board state isn’t really any different – you’re going to take either 1 damage from his attack, or you’re going to get hit for 1 retaliate damage. So it’s typically better to wait until you can use a single big attack to clear these off the board, or just ignore it until small indirect damage hits can take it down.
Not all minions should be ignored. Badoon Warlord (GMW #121) is one of them. It not only has 3 attack, but it also has overkill on that attack, meaning allies cannot soak all the damage. It has 4 health, meaning not a lot of things can kill it with one hit, but it is worth spending an attack card or boosted basic ability to remove it as soon as possible.
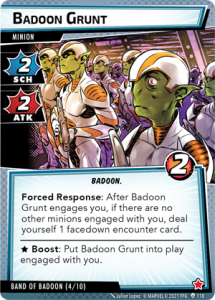
Image © Fantasy Flight Games
The minion that is most likely to come out is one of the three copies of Badoon Grunt (GMW #118). It not only has 2 attack and scheme, but when used as boost it forces you to put it in play. When it comes into play, and if you don’t have another minion engaged with you already, you get an extra facedown encounter card. This is where keeping those Assassins and Sentries in play comes in handy, because you can very quickly and suddenly die. Let’s say you defend against an attack from Drang – it boosts in a Badoon Grunt who hits you after the villain, and brings in an encounter card that turns into a Badoon Assassin. All of a sudden instead of the 0 damage you were expecting after your defence, you’ve taken 5 damage. Ouch. This happens… surprisingly regularly. So be prepared for it. On the plus side, the 2 health of the Grunt is very good for responses like Hawkeye (Core set #66), that can kill it as soon as it enters play. Don’t forget that since Hawkeye’s ability is in response to Badoon Grunt entering, you’ll always get the encounter card.
The last minion in Band of Badoon module is Badoon Lietenant (GMW #119), and he is the most annoying of them all. There is only one copy in the module but is enough to delay you. He has 2 attack and 2 scheme, on a 6 health body – a lot to deal with if you’re not aggression, and that is 6 or more damage that is not going on the boss. This villain has a lot of acceleration icons, most on expert campaign, so this minion can lose you the game before you know it. Not much can be done except killing him or moving him to another player with events like Get Over Here! (Thor #14).
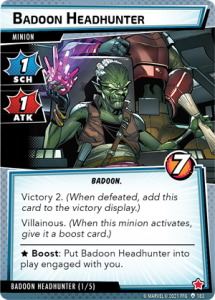
Image © Fantasy Flight Games
Lastly, if you are running campaign you will eventually meet the Badoon Headhunter. He is possibly the scariest minion, as he gets boosts cards when he attacks and schemes, making him very unpredictable and increasing the chance of unpleasant boost effects (like an extra Badoon Grunt). If you are running Target Acquired (Black Widow #24) you can stop him from entering from a boost, but we don’t recommended it unless you’re in danger of losing. Yes, he is scary and 7 health is a lot, but the 2 units he gives for your campaign are extremely important.
That being said, killing him will make your future campaign villains harder by introducing some additional, extremely nasty treacheries. If you have planned out your shopping list from the market, and think you can spare the 2 units, it is potentially a good strategy to not defeat him, but we think it is better to do that later in the campaign if you intend it, as it gives you more leeway to beat the harder villains.
Building The Deck
Now that you know what you are against, you can start building your deck with confidence. Honestly, the basic decks of Groot and Rocket Racoon are good enough for at least Drang, they just need a few tweaks. Alternatively, switching Rocket’s Aggression for Justice will make it easier to both control the schemes and provide consistent damage output.
A card we like to highlight is Target Acquired (Black Widow #24). Not just for Drang, but for the future of the campaign, it is a card that can save you from extra minions boosting into play, which is something that happens a lot throughout Galaxy’s Most Wanted.
Another important card you may want to add is Endurance (Ms. Marvel #23). It will help you stay in your hero form longer, and not allow the villain to scheme and get the main scheme under control. Drang hits hard, and so do Nebula and Ronin. Those extra 3 hit points can quite literally save your life.
Having Justice with you in multiplayer if you’re playing the campaign is extremely good because of one card – Under Surveillance (Thor #31). It will not only stop you from losing the game but it can help a lot for getting the maximum units at the end of the scenario.
Draw mechanics are, as always, very strong, if you can’t afford an Avenger Mansion (Core set #91), Mystics get access to Spiritual Meditation (Scarlet Witch #19) to help you find the cards you need quickly, and heroes with the ability to draw cards from their abilities like Spider Man and Captain Marvel are always good. If you are running Aggression, consider Hall of Heroes (Thor #17), as there will be a lot of minions to kill along the way. Justice should prioritise Clear the Area (Rise of Red Skull #49) over Skilled Investigator (Rise of Red Skull #47), as it’s far less situational. For Protection – Unflappable (Doctor Strange #17) is a good draw option, particularly if you play Groot. For Leadership, Strength in Numbers (Captain America #17) is extremely powerful, particularly if you’re playing an Avenger who can just keep Stinger (Ant-Man #14) handy.
All decks should at least consider Nick Fury (Core set #84), as he is very versatile – his card draw in particular allows you to draw cards to replace those spent on playing him (which is almost always a better choice than his other modes). His thwart and attack are no joke, and as he’s discarded at the end of the round, you’ve got no reason not to throw him under the bus to block one of those big attacks Drang will send your way.
If you want to know more basics on building decks, make sure you read Cardboard Matt’s guide on building your first Marvel Champion’s deck.
Conclusion
Drang hits hard, no doubt about it, and his main scheme can get out of hand pretty quickly. But by figuring out how best to respond to the situation, and making sure your deck’s working as you need it to, you can consistently defeat Drang. Make sure you clean as much as you can those acceleration icons, plan your Milano use, and don’t rush to kill every single minion that comes out.
We’ve been trying out different decks against Drang recently, most of which you can see on our Twitch stream at Twitch.com/CardboadChampions. Drang’s a great villain for testing your decks in general, as he’s got a good combination of heavy-hitting attacks, big side schemes and annoying minions. If your deck works against Drang, you can be pretty sure it’ll hold up against everyone else. Here’s our latest work in progress: